
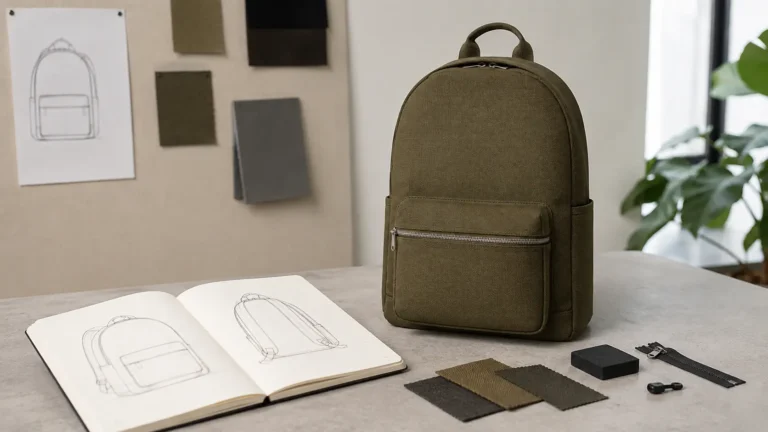
If you are figuring out how to design a backpack for manufacturing, you do not always need to begin with a finished tech pack. A custom backpack project can start with reference images, a rough sketch, a few dimensions and a list of functions the backpack needs to perform.
The harder part is turning those ideas into a design that can actually be sampled and manufactured. A clean-looking drawing may still create problems with laptop access, usable capacity, pocket expansion or carrying comfort once the bag becomes a physical product.
To understand how to design a backpack for manufacturing, first define who will use it and what it needs to carry. Turn those requirements into a product brief, review the size, structure, materials and hardware for manufacturability, then build and test a physical sample. Any changes that affect fit, function or construction should be verified before the final production reference is approved.
Buyers who prefer to begin with an existing structure can also review Annabelle Bag’s custom backpacks and use a suitable style as the starting reference for development.
Start With a Product Brief, Not a Perfect Tech Pack
A complete tech pack is useful when a design is already well developed, but it is not always necessary for the first discussion with a backpack manufacturer.
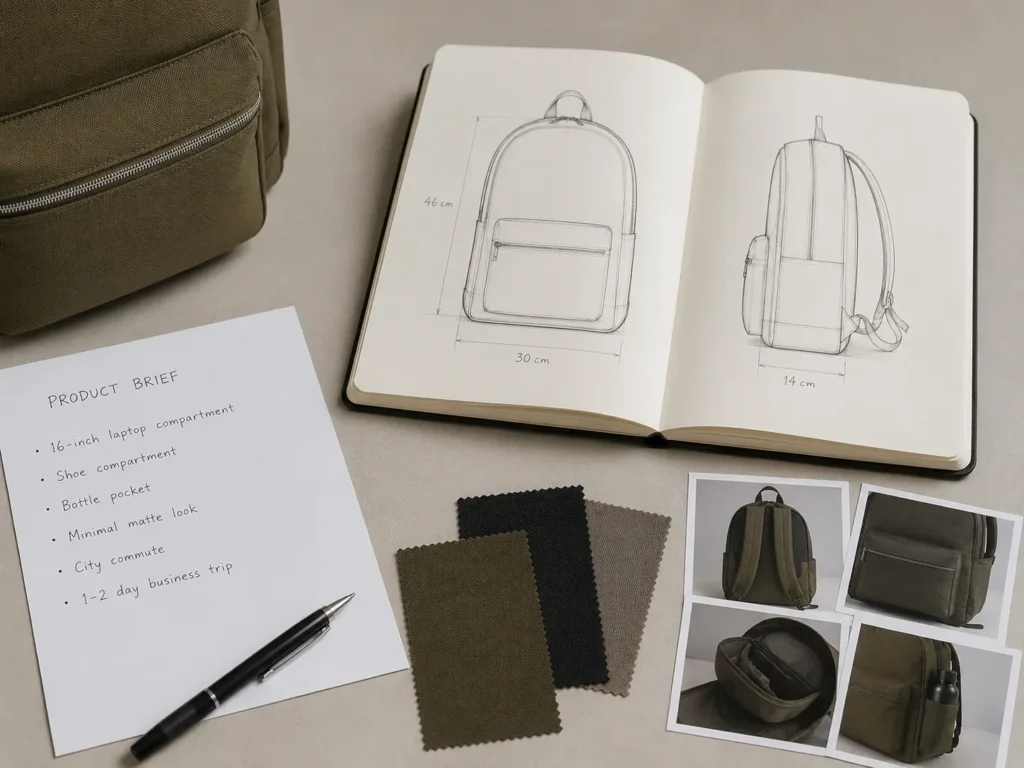
A workable starting point can be much simpler:
- reference photos
- front and back sketches
- approximate dimensions
- a list of required functions
- target quantity
- target market
- visual direction
- logo requirements
- target price range, if available
The purpose of this early product brief is not to answer every construction question. It is to make the buyer’s priorities clear enough for the manufacturer to identify missing information and potential conflicts.
For example, one commuter-backpack project started without a formal tech pack or an original physical sample. The buyer provided several reference images collected from Pinterest and Instagram, a hand-drawn front and back sketch, several basic dimensions and a Word document listing the required functions.
The original dimensions were approximately 46 × 30 × 14 cm.
The product was intended for urban commuters and one- to two-day business trips. It needed to fit a 16-inch MacBook Pro while maintaining a minimal matte appearance with very little visible stitching on the front panel.
That information was enough to begin a structural review.
A Simple Product Brief Can Include
| Item | Example |
|---|---|
| Intended user | Urban commuter |
| Main use | Daily commute and 1–2 day business trips |
| Main contents | 16-inch laptop, clothing and daily accessories |
| Approximate size | 46 × 30 × 14 cm |
| Visual direction | Minimal, matte and clean |
| Reference material | Photos and hand sketch |
| Required functions | Laptop compartment, shoe storage, bottle pocket |
| Branding | Discreet logo |
| Initial order direction | Small first production run |
The buyer does not need to solve every sewing or construction detail at this point. The first brief needs to explain what the backpack is supposed to do and which requirements matter most.
Once the specification becomes clear enough for pricing, quotations should also be compared against the same backpack version and scope. Our guide to comparing custom backpack quotes explains that later purchasing step in more detail.
How to Design a Backpack Around What It Needs to Carry
Backpack design should begin with contents rather than appearance alone.
A laptop, shoes, clothing, charger and water bottle all compete for physical space inside the same bag. Their position can also change the opening, padding, body depth and internal construction.
This is why two backpacks with similar outside dimensions may work very differently in real use.
Consider a padded laptop compartment. Increasing the foam thickness may improve protection in one area, but it also reduces usable internal volume. Adding an independent shoe compartment takes more space from the main compartment. If both features are added without reconsidering the body depth, the finished backpack may behave very differently from the original sketch.
For the commuter project above, the buyer originally wanted a slim 14 cm body together with a padded laptop compartment and separate shoe storage.
During the pattern review, that combination created a conflict. Once shoes occupied the lower section, the available space around the laptop compartment and main storage area became too limited.
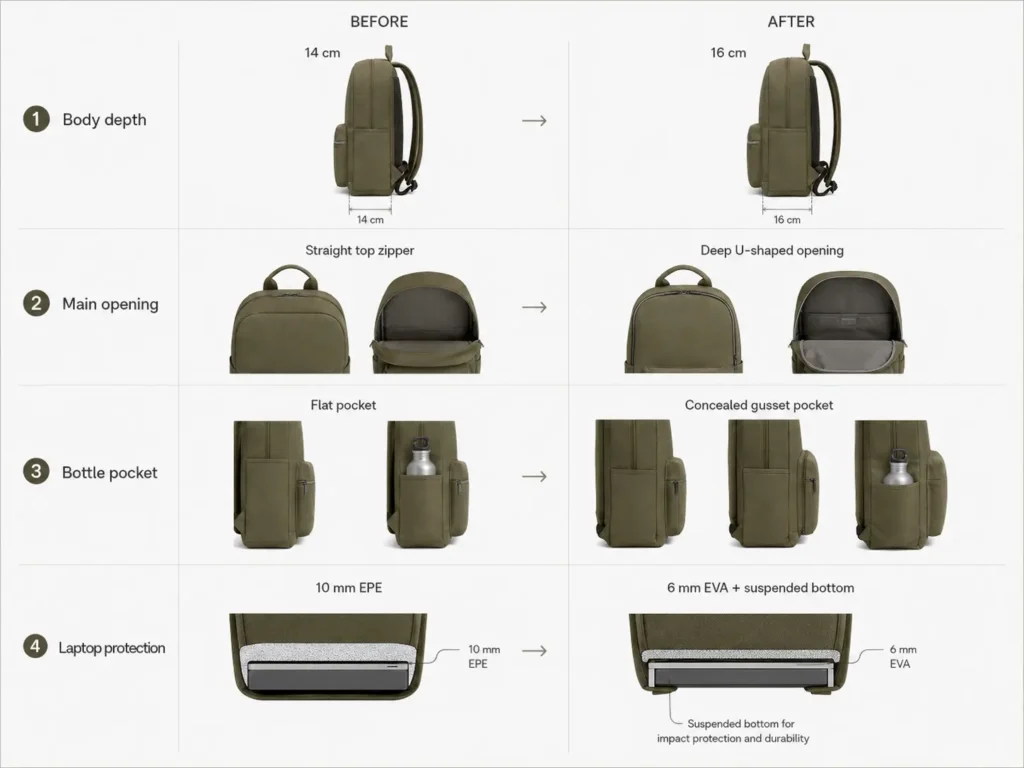
The body depth was therefore increased from 14 cm to 16 cm before sampling.
The 16 cm depth was not a general specification for commuter backpacks. It was an adjustment for this particular combination of contents and structure.
Before confirming dimensions, the useful question is:
What will normally be inside the backpack when it is actually being used?
That answer should guide the internal design.
Turn the Use Case Into Size and Compartment Decisions
Once the expected contents are clear, the external dimensions and internal layout can be developed together.
Typical decisions include:
- overall height, width and depth
- main compartment volume
- laptop sleeve dimensions
- front and internal pockets
- shoe or secondary compartments
- bottle pockets
- document or passport storage
- opening direction
- lining and divider structure
These details should not be treated as independent features.
A separate compartment does not create additional space simply because it is drawn inside the bag. It divides the volume that is already available.
The same applies to padded panels, reinforced bottoms and internal organizers.
One useful way to review the layout is to imagine the backpack fully packed rather than empty.
If the laptop is inside, the shoe compartment is occupied and the main compartment contains clothing, can every important pocket still be accessed?
If not, the layout should be reconsidered before the pattern is finalized.
Design the Opening, Pockets and Access Around Real Use
Opening shape is easy to underestimate when designing from a front-view sketch.
A clean horizontal zipper may look better on paper than a deeper opening, but the usable opening still has to match the size and stiffness of the items entering the backpack.
In the commuter-backpack project, the original sketch used a straight top zipper because the buyer wanted a very clean upper profile.
During the manufacturing review, however, the padded laptop sleeve and surrounding structure made access to a 16-inch laptop unnecessarily restrictive.
The zipper was changed to a deeper U-shaped opening, extending approximately 6 cm farther down each side.
The side bottle pocket created a different problem.
The buyer wanted the pocket to remain almost invisible when it was not being used, so the original drawing showed a flat side pocket with no expansion.
That worked visually while the backpack was empty. Once the main compartment was packed, there would be little room left for a bottle.
A concealed gusset was added inside the pocket. The pocket remained relatively flat when empty but could expand outward when a bottle was inserted.
A feature therefore needs to be checked in the condition in which it will actually be used, not only when the backpack is empty.
Plan the Shoulder Straps and Load-Bearing Structure
Shoulder straps are both a visual and structural part of a backpack.
Their width, curvature, spacing, padding and attachment position affect how the bag sits against the body. These details become more important as the expected load increases.
The first sample of the commuter backpack used relatively narrow 5.5 cm shoulder straps because the buyer wanted a cleaner appearance.
The upper strap spacing was also narrow, at approximately 5 cm.
The backpack looked acceptable when viewed on a table. After the buyer actually wore the sample, the problem became obvious: the strap position felt too tight around the upper back and neck area.
For the second sample:
- strap width increased from 5.5 cm to 6.5 cm
- upper strap spacing increased from 5 cm to 6.5 cm
- the internal padding construction was changed to a softer foam with breathable sandwich mesh
These dimensions describe one project rather than a universal backpack specification. Body type, backpack size, expected load and target market all influence the final decision.
Load-bearing areas also need to be reviewed separately from appearance.
Typical areas include:
- shoulder-strap attachment points
- top handle connections
- lower strap joints
- bottom panels
- heavy compartment seams
Reinforcement should follow the expected load and construction rather than being added everywhere simply to make the backpack appear stronger.
Choose Materials Based on Function, Structure and Target Cost
Material selection becomes easier once the product structure is reasonably clear.
Starting with the fabric alone can create the wrong development sequence because the same appearance can often be approached through different fabrics, coatings, backings and reinforcement methods.
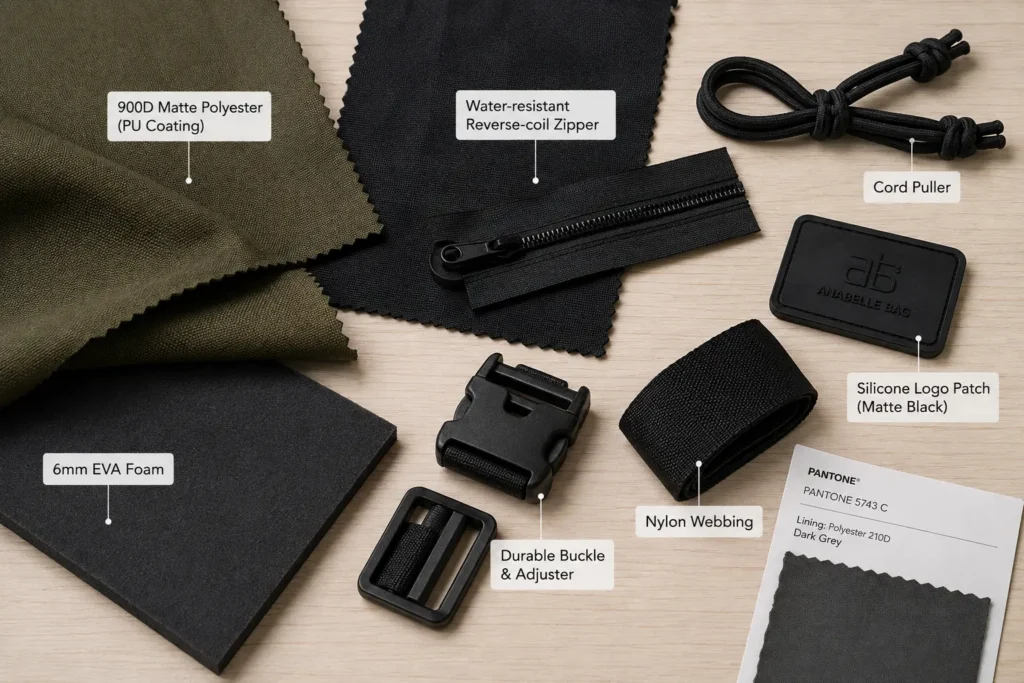
For the commuter project, the buyer initially wanted a material with a leather-like premium feel but had a limited target cost.
Instead of using genuine leather, the first sample used a high-density matte 900D polyester with a PU coating. It was paired with a matte reverse-coil water-resistant zipper to keep the visual direction clean.
The laptop padding was also reconsidered.
The original idea used 10 mm EPE foam. The pattern review showed that this amount of padding would consume too much internal space for the proposed structure.
For this project, it was changed to 6 mm high-density EVA combined with a suspended laptop sleeve. The bottom of the laptop compartment was positioned approximately 25 mm above the bottom of the backpack so the computer would not sit directly against the base.
The design decision was therefore not simply:
thicker foam = better backpack.
The actual trade-off involved protection, available volume, structure and target appearance.
Material discussions should consider several factors together:
- required appearance
- abrasion and daily-use requirements
- body stiffness
- weight
- coating or water-resistance direction
- sewing construction
- target price
- order quantity
For a deeper material-development process, see our custom backpack material selection guide.
If the main decision is specifically between the two common synthetic fibers, our nylon vs polyester bags comparison explains why fiber name and denier alone do not determine the final result.
Confirm Hardware, Branding and Small Visual Details
Hardware and branding are sometimes left until the end of the design process, but they can affect cost, development time and the way the backpack feels in use.
Items to confirm may include:
- zipper type
- zipper puller
- buckles and adjusters
- webbing
- hooks
- logo method
- label position
- hardware finish
- Pantone or color reference
- packaging requirements
The commuter-backpack buyer initially wanted a custom metal logo plate.
For the first development sample, however, custom tooling would have added cost and additional development work. The sample therefore used a matte black molded silicone logo patch with a stitched edge.
The zipper pullers also changed after the sample was tested.
The first sample used metal alloy pullers. When the buyer walked with the backpack, the two pullers could strike each other and create a noticeable metallic sound.
They were replaced with rubberized cord pullers in the revised sample.
This issue was not visible on the design drawing or material board. It became obvious when the physical backpack was carried.
Let the Factory Review the Design for Manufacturability
Learning how to design a backpack for manufacturing also means understanding where visual requirements and physical construction can conflict.A drawing shows what a backpack should look like.
A manufacturing review asks a different question:
Can these requirements work together as a physical product?
This is where design for manufacturability, or DFM, becomes useful.
The factory review should identify details that may look acceptable on a drawing but become impractical, inefficient or unnecessarily expensive once translated into patterns and sewn components.
In the commuter-backpack project, several conflicts appeared before the first sample was made.
| Original Requirement | Manufacturing Problem | Adjustment |
|---|---|---|
| 14 cm slim body | Shoe compartment and padded laptop section consumed too much usable space | Body depth increased to 16 cm |
| Straight top zipper | Restricted practical laptop access | Changed to a deeper U-shaped opening |
| Flat hidden bottle pocket | No expansion when main compartment was full | Concealed gusset added |
| 10 mm EPE laptop padding | Took too much space from the main compartment | Changed to 6 mm EVA with suspended bottom |
| Custom metal logo | Added tooling cost and development time | Molded silicone patch used for sampling |
None of these changes meant that the original design direction was wrong.
The problem was that several individually reasonable requirements conflicted once they were combined into one backpack.
Other conflicts can involve:
- buckle size not matching webbing width
- logo details that are too fine for the selected branding method
- thick materials around tight curved seams
- pockets interfering with zipper openings
- reinforcement adding unwanted stiffness
- hardware increasing weight or cost beyond the original target
The purpose of DFM review is not to redesign the backpack without the buyer. It is to identify trade-offs early enough for the buyer to decide what should change before time and material are spent on the wrong construction.
How the First Backpack Sample Is Made
Once the main design decisions are confirmed, the backpack can move into physical development.
The exact workflow varies by project, but the first sample normally requires the design information to be translated into actual construction details.
A simplified sequence is:
Product brief and references
↓
Dimension and structure review
↓
Material and trim confirmation
↓
Pattern making
↓
Cutting
↓
Logo application and component preparation
↓
Sewing and assembly
↓
First physical sample
The first sample is where assumptions made during the design stage become visible.
A pocket dimension that looked reasonable on a sketch can now be tested with real objects. The buyer can wear the backpack rather than judging strap placement from a flat drawing. The front panel can be checked both when the bag is packed and when it is empty.
The sample is therefore part of product development, not only a workmanship check.
For Annabelle Bag’s current sampling requirements, revision process and project information, see our custom bag sample support.
What the First Sample Should Actually Be Tested For
Checking whether the sample “looks good” is not enough.
The backpack should be packed and used in conditions that resemble its intended use.
For a commuter backpack, that may mean loading it with a laptop, charger, documents, clothing, bottle and other normal travel items.
The review should consider areas such as:
- overall dimensions
- actual usable capacity
- laptop fit and protection
- access to the main compartment
- pocket access when the bag is full
- zipper movement
- strap comfort
- backpack balance when loaded
- body stiffness
- reinforcement
- logo size and position
- hardware behavior
- workmanship and stitching
- appearance when partially filled or empty
The commuter project shows why this matters.
The overall shape of the first sample was well received, but several issues only became clear after the buyer handled and wore it.
The shoulder straps felt too tight
The original strap width and upper spacing looked clean visually, but the buyer found the carrying position uncomfortable.
The geometry was changed for the second sample.
The metal zipper pullers were noisy
This was not a stitching defect. The components worked correctly, but their behavior while walking did not match the intended product experience.
Cord pullers were used instead.
The main compartment felt too empty
After physically using the backpack, the buyer decided the internal organization was too simple. A semi-transparent mesh zipper pocket was added inside for items such as a passport and charging cables.
The front panel collapsed when the bag was not full
The buyer wanted the backpack to keep a cleaner standing shape for product presentation and daily use. A thin T/C stiffening interlining was laminated behind the front panel.
These were not simply defects in the first sample.
They were development findings that were difficult to evaluate from drawings alone.
When Does a Backpack Need Another Sample?
Not every backpack project automatically requires the same number of samples.
A second sample becomes more important when the requested revisions affect structure, fit, carrying comfort, dimensions or other elements that cannot be confidently approved from photographs or written comments alone.
In this project, a second sample was necessary.
The changes included:
- shoulder-strap width
- strap curvature and spacing
- padding construction
- front-panel stiffness
- internal organization
- zipper pullers
Several of these changes affected either carrying comfort or the physical structure of the backpack.
Approving the first sample and leaving those corrections until bulk production would have introduced unnecessary risk.
The revised sample was therefore made using the intended 900D matte material and updated construction.
After the buyer checked the second sample, it was approved as the production reference sample, often called a golden sample.
The first production order was then placed for 500 pieces.
This does not mean that every backpack requires two samples. The practical question is whether the revision changes something that materially affects fit, function, construction or the final appearance.
If it does, the revised detail should be physically verified when the project risk justifies another sample.
Approve the Reference Sample Before Bulk Production
Sample approval should mean more than saying that the backpack looks acceptable.
Before treating the sample as the production reference, the buyer and manufacturer should have the same understanding of the approved details.
That may include:
- dimensions
- material
- color
- pocket layout
- laptop compartment
- foam and reinforcement
- shoulder straps
- zipper and hardware
- logo method and position
- labels
- workmanship direction
- confirmed packing details
The physical sample should also match the latest specification and revision notes.
A reference sample is useful during production, but it does not replace written dimensions, material information or other confirmed order requirements.
If something changes after approval, the change should be recorded rather than relying on an isolated message such as “make the strap slightly wider.”
That written record is what allows the approved design to move into production without reopening decisions that were already settled.
When the Backpack Design Is Ready to Move Forward
Knowing how to design a backpack is not only about completing the drawing. The design is ready for the next stage when the intended use is clear, the main structure works with the actual contents, materials and components are defined well enough for the project, and the physical sample has confirmed the details that cannot be judged reliably from a drawing.
The goal is not to reproduce the first sketch at any cost. It is to preserve the product idea while resolving the conflicts that appear when that idea is turned into a manufacturable backpack.
Planning a Custom Backpack Project?
If you already have reference images, a sketch, an existing product or an initial specification, those materials can be used as the starting point for development.
Prepare the intended use, approximate dimensions, target quantity, logo requirements and the functions that matter most. Then review suitable custom backpack structures and development options before the first sample is made.
Related Backpack Guides
For material decisions: Custom Backpack Material Selection: What Buyers Should Define First
For fiber and construction comparison: Nylon vs Polyester Bags: What Actually Changes in the Finished Bag?
For purchasing after the design is defined: How to Compare Custom Backpack Quotes Before You Order
For retail sourcing: How to Buy Backpacks in Bulk for Retail
For a documented production-quality example: Custom Backpack Quality Inspection Case Study